Dienstag, 31. Dezember 2013

12 Days of Christmas Redwork I Day 7

I hope right at this moment you are having a great time with the important people in your life, counting down the last of 2013 and getting ready to welcome the New Year.
So this is part seven of the pattern and also the last part for this year. We are back on the right hand side.


Montag, 30. Dezember 2013

12 Days of Christmas Redwork I Day 6

Today i'm sharing part six of the pattern, which I find an especially interesting part to stitch with all the little details. The birds, berries and little star actually take a little time, but they are such fun to do that the time just flies by without noticing it.


Sonntag, 29. Dezember 2013

12 days of Christmas Redwork I Day 5

Two more days until New Year's Eve. I don't know how you are feeling but my head is full with new year's resolutions and plans for 2014.
So let's focus. Next part is the branch above yesterday's.


Samstag, 28. Dezember 2013

12 Days of Christmas Redwork I Day 4

Hello cross stitchers. It's day 4 and time for another part of the pattern. Today we are finishing the twig on the lower left hand side. Have fun!


Freitag, 27. Dezember 2013

12 Days of Christmas Redwork I Day 3

Good morning folks, how are you doing? Are you ready for some stitching? Here comes the third part. We continue on the right hand side above the piece we completed yesterday. Have a nice day!


Donnerstag, 26. Dezember 2013

12 Days of Christmas Redwork I Day 2

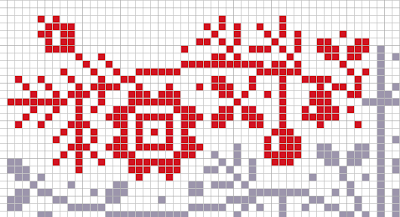
Here's the second part of the pattern. We continue on the lower right hand side which connects to the section with the bird that you will have hopefully completed yesterday and which is still shown in grey for reference. Enjoy your Boxing Day. See you tomorrow!


Mittwoch, 25. Dezember 2013

12 Days of Christmas Redwork I Day 1

I'm wishing you merry christmas and hope you had a wonderful day!
It's the first day of christmas and time for the first part of the redwork pattern that i'm sharing with you.
We will begin in the lower middle. Cross - Stitching the pot for our tree and some ornaments.
Have fun guys!
For the ones who followed me on Instagram, i've rewritten my scribbles in a fancy cross stitch program and it should be a lot easier to read now. Enjoy!


Donnerstag, 5. Dezember 2013

12 Days of Christmas Redwork I Sneak and Introduction


Are you looking forward to Christmas?
I do for sure, but i also enjoy the build up and the quiet 12 days afterwards which always make me reflect on the passing year and open my mind and heart for everything the new year will bring.

You might even look for a little project for this special time.
If you like cross stitching, you might like this.

Beginning with Christmas day i'm going to share the pattern of my Redwork christmas tree day by day, so you can stitch along, calm down and on the 12th day of christmas you are already holding a beautiful finished first project of 2014 in your hands.

The only supplies you will need is some aida, linen or evenwave, thread in your favorite color, needle, scissors and an embroidery hoop.

If you have any questions, please don't hesitate to ask.

Donnerstag, 28. November 2013

December Daily 2013 I Cover

Some of you might already figured out where my new blog title picture is from.
Yes indeed, it is the cover of my december daily album that i created a few weeks ago after i received my December Daily Kit from Studio Calico. 
It is an awesome kit with a beautiful color scheme featuring shades of blue and green with red and gold as bold accents.
It came with a chipboard handbook style album which left lots of room for personal alterations.


For my album cover, i've mixed acrylic paints to achieve a similar shade to the color scheme of the kit. Then painted the chipboard with three layers and sealed it with varnish.
I also covered the wood veneer "25" with glossy accents and gold chunky glitter. 
The card of the little girl with the presents was simple too pretty to be hidden away in the album so i gave her a special place on the front. She makes me smile every time i look at it. 
I've used the Pom Pom ribbon as an border for the red fabric back of the album. It makes it so soft to hold the album in your hands. 
Thanks for looking!


Mittwoch, 13. November 2013

Thank you Lovely

Today i'm sharing an autumn card that i made with the October kit from Studio Calico.

Dienstag, 29. Oktober 2013

Redwork piece day by day

I found this cross stitched Christmas tree picture on Pinterest and instantly fell in love with it and with finding that picture i think i also found the perfect project and solution for our little problem. Being crafty and spend time with my husband the same time.
With November on the doorstep, Autumn will be soon over and Christmas is not here yet, the evening are getting darker and quieter. Time to cuddle on the sofa, read books, light candles and working on my evening project.


What i'm going to do is draw a quick chart based on the picture, cross stitch and share my progress with you. Although i will turn it into a Redwork piece and cross stitch it with single thread on 18 count aida in white. The only reason why i don't stitch it on linen is that i have non at home and found the aida in a box in the attic.

I will share my progress in pictures day by day on Instagram. I'm going to use the hashtag #redworkdaybyday. I will also share the patterns on my blog in the near future.

Donnerstag, 3. Oktober 2013

Jot Mood board challenge No.10

The new mood board for October is up on the Jot magazine website.
Created by Sharmaine Kruijver
Think greens - grassy, lime and bottle green combined with black sketchings, white spaces and world maps.


So i did and took my turn on the challenge! 
I die cut a journaling card from green card stock, then stamped some doodled flowers on it.
I added a sentiment and some clouds and raindrops.


Supplies:
Cardstock: "Pool" and "Grass" from Hero Arts
Patterned Paper: Studio Calico
Stamps: "Doodle Deux" from Prima Marketing and "From me to you" roller stamp from Pebbles
Letters: Kesi'Art
Die Cut Clouds: Studio Calico
Die: "Stitched journaling card" from Lawn Fawn 

Donnerstag, 5. September 2013

Ideas with Washi Tape

I simply love this idea.
Enjoy your chocolate pudding, throw glass in dish washer, wrap Washi Tape around it, add a a little bow for decoration and fill it with some goodies.
There are endless possibilities. I'm using mine for mini pegs and buttons. But i'm sure they won't be the last ones i will make... Already looking forward to the chocolate pudding.


Fallen

This plaster sculpture was an experiment of blind shaping a wire frame and connecting the wire with plastered fabric. The outcome was unpredictable. The little man who developed from this project found a new home in my art supply shelf until yesterday when he was misused for this photography experiment fallen from the scaffolding of the building site outside our house. Very dramatic and totally not serious.


Dienstag, 16. Juli 2013

A nice surprise and another challenge

Remember the Summer card that i've created for the Inked Classroom over at Studio Calico. I've entered my card for the first week`s challenge and guess what. I've won. Really cheered me up and made my day.

For the second week`s classroom challenge I`ve created this card using the chalkboard effect technique. Arranging the stamps i've ended with a more masculine style card without intending to do so. Means i've planned to put some hawaiian flowers on too. After consulting my hubby "What do you think about these flowers" and the answer was "No" "Maybe one flower then " "Er, No" and after a while "Maybe some ribbon" the answer was still No.
I gave up in the end, layered the stamped piece with a few dimensionals and left it as it is. I kind of like it but i must admit my girlie head still finds it a bit "naked".


Dienstag, 2. Juli 2013

Studio Calico - Inked - Day One - Stamping on patterned paper


Wow, what an amazing technique. Even though i stamped on patterned paper before, i never did it in this way.
When i saw the video, i instantly thought about a stamp set that was dusting in my drawers because i never quite knew what to do with it. So here we go, thanks a lot for the inspiration Nichol.


Mittwoch, 12. Juni 2013

Creativity Is Contagious

After i've seen the Die Cuts and Paper from Josephine Kimberling in my latest Studio Calico kit i've instantly fell in love with them.
At the end they inspired me to following project, which now serves as motivation on my scrapbooking desk.


Freitag, 24. Mai 2013

Freitag, 3. Mai 2013

Studio Calico Scraplifts No. 1

zur geistigen Entspannung habe ich in den letzten Wochen folgende wunderschöne Karten des Studio Calico Design Teams nachgearbeitet und mit persönlichen Akzenten versehen..


You & Me

Das Design dieser Karte hat sich aufbauend auf der zuerst gearbeiteten Filzblume entwickelt. 
Ich liebe Filz! Für mich einfach ein wunderbares, Wärme- und Zufriedenheit verströmendes Material.


Freitag, 5. April 2013

New York, New York ehm Home


Relief - Zweite Abformung

die zweite Abformung meines Tonmodells ist trocken und ich kann sie euch nun zeigen. Ich habe in diesem zweiten Schritt versucht ausschliesslich durch Richtungsgebung und Stärke einer zusätzlichen Hintergrundstruktur eine weitere Tiefendimension zu erzeugen.


Meine Reise führt mich nun weiter zu einer neuen Herausforderung in Form einer Abstraktion in Form- und Farbabstufungen der ursprünglichen Skizzen auf Leinwand. Das Ergebnis dieses Experiments hoffe ich euch dann in einigen Wochen zeigen zu können.

Donnerstag, 4. April 2013

Avocado zum Selberbauen

Nachdem meine vor Ostern gekauften Avocados nun endlich auch einmal reif bzw. knapp überfällig geworden sind, den geplanten Salat an Ostern gab es dann halt ohne, habe ich diese heute Mittag auseinandergenommen und aus den Kernen haben mich winzig kleine Wurzelchen angelacht. Pflanz mich... Ich will wachsen und gedeihen. Nach tagelangem Grau in Grau lies ich mir das nicht zweimal sagen und habe ihnen eine Chance gegeben.
Für alle die nun Lust verspüren ihren eigenen Pflänzchen beim Wachsen zuzuschauen... und das geht bei Avocados ziemlich schnell... zeige ich hier nun eine Möglichkeit die Kerne zum Keimen zu bringen.

Ihr braucht:
- Avocadokerne, vorsichtig das Fruchtfleisch abwaschen damit sie nicht schimmeln können
- Zahnstocher oder ähnliches
- kleine Wassergläser, Yoghurtbecher etc.
- ein bisschen Geduld und Aufmerksamkeit


Was nun:
- steckt jeweils 3 Zahnstocher in die obere Hälfte der Avocado (Achtung! Nicht zu tief) diese dienen als Halterung im Wasserglas
- füllt die Gläser mit Wasser und setzt die Kerne hinein, sodass sie zur Hälfte im Wasser stehen


Wie geht es weiter:
Nun kommt die Aufmerksamkeit und die Geduld ins Spiel.
- Achtet auf einen gleichmässigen Wasserstand, wenn der Wasserspiegel absinkt, vorsichtig nachfüllen und darauf achten, dass die Spitze trocken bleibt.
- Warten bis sich nach ein paar Wochen genügend Wurzeln gebildet und das Pflänzchen umgetopft werden kann.